Introduction to the Basic Position
Lesson plan

Worksheet no. 2a (Inverted L-shaped Enter key for macOS and Windows)
Worksheet no. 2b (Horizontal Enter key for macOS and Windows)
Worksheet no. 2c (Inverted L-shaped Enter key for ChromeOS)

Worksheet no. 2d (Horizontal Enter key for ChromeOS)
Worksheet no. 3a (Inverted L-shaped Enter key for macOS and Windows)

Worksheet no. 3b (Horizontal Enter key for macOS and Windows)

Worksheet no. 3c (Inverted L-shaped Enter key for ChromeOS)
Worksheet no. 3d (Horizontal Enter key for ChromeOS)
Objective
Introduce students to the basic position and make them aware of the different keyboard zones and the fingers associated with each one.
Time
20 minutes
Materials required
- Worksheet no. 2
- Worksheet no. 3
- Colored pencils in six different colors
Preparation
Familiarize yourself with the principles of the basic position by reading the Typing Method article.
Activity plan
For this activity, each student must be seated in front of a keyboard.
- Ask students to close their eyes. Give them two minutes to explore the keyboard using their fingertips and to look for all the possible ways to tell the difference between keys, using only their sense of touch.
- Ask students to share their ideas with the class about the features that helped them recognize different keys with their eyes closed. Here are some examples of features:
- The position of the keys in relation to the keyboard edge
- The shape of the keys
- The size of the keys
- The surface of the keys
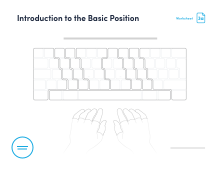
- Once they have listed all the examples above, explain to students how the two tactile reference points help to position the index fingers on the keyboard. Then, show them the basic position for the other fingers.
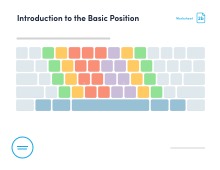
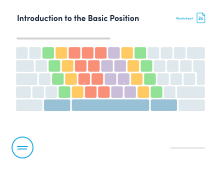
- Share Worksheet no. 2 with your class by projecting it on the board. Ask them what the colors on the keyboard refer to. Explain that the colored zones show which finger should be used for typing each of the keys.
- Give a photocopy of Worksheet no. 3 (which shows the keyboard) to each of your students.
- Ask them to color the keys with a different color for each of the fingers, as shown on Worksheet no. 2. Careful! A different color is used for each of the index fingers because their zones are side by side.
- Once the sheet is colored in, invite the students to take the basic position by placing their fingers on their sheets in the correct places. Ask them to type each of the keys. The colors tell them which fingers to use in each case.